Thursday, March 31, 2011

Long Grove Quilt

When I was at the Arizona Quilters Guild show, I was especially impressed with Long Grove by Georgia Thorne. I want to live in this quilt. A pictoral, with a beautiful blend of techniques. With 3-D houses Thread play and buttons. After seeing this quilt, it made me want to get out my machine and experiment with a few more stitches. Fabulous movement in thread. Georgia wrote "Growing up in the Midwest, I was influenced by the many layered landscapes. This further challenged me to use various techniques and textures to portray the fields, and a small town, Long Grove, IL." Long Grove won the Hall of Fame award, presented by the show sponsor to a quilt deemed worthy of recognition. Inspirational work, Georgia! While visiting this show, I enjoyed learning more about the Arizona Quilters Hall of Fame, an organization that is dedicated to celebrating the contributions of Arizonans to quiltmaking. They have a very impressive web site, offering a virtual museum, monthly quilt show, and E-newsletters.

Tuesday, March 29, 2011

Taking the Granny Out of Crochet

Did you live through the 1970's crocheting Granny Squares? The adage What is old, is new again continues to ring true. Cate Blanchett models taking the Granny out of crochet. For a fun article, run over to Crochet Magazine to read more.

Friday, March 25, 2011

Totally Tutorials

I often add new blogs to my sidebar, and I was thinking it would be a nice idea to share with you some of my finds.
There are so many choices out there in blogland, and everyone has different tastes (which is good!).
These are blogs that stir the creative juices and make me say "Oh, I like what you are doing. I want to see more."
Today's addition:
Totally Tutorials
Dotty has gathered a wide selection of tutorials under one roof.
Looking for ideas for applique, crochet, embroidery, recipes, and of course quilts?
There are 576 leads under the Sewing category alone.
There are multiple postings every day.

Just in the last few days there has been postings on:
Pendants by My World Made By Hand

How To Make A Travel Bib by B Is For Boy

Fat Quarter Cape by Maubys
***This is also a great place to share your own tutorials that you've worked so hard to develop.
Dotty shares this about her site:
Would you like to learn something new or share your expertise? Then you've found the right place.
This blog is a collection of tips, tricks, tutorials and how-tos on a wide variety of subjects.
Looking for a tutorial on a particular subject? You can use the search box or click on a label.
All blogs that I link to will be family friendly.

Thursday, March 24, 2011

Knifty Knitter Hat Tutorial

I received a lot of e-mails from non-knitters yesterday, asking how difficult it would be to make a hat using the Knifty Knitter looms.
What better way to answer that question than to just show you with a tutorial.
There are 4 different sized round looms in the package, which also includes the pick and a needle. You can find various sized sets on Amazon.com or in most craft stores.
I'm using the red round loom for this tutorial, which will make a medium/child sized hat.

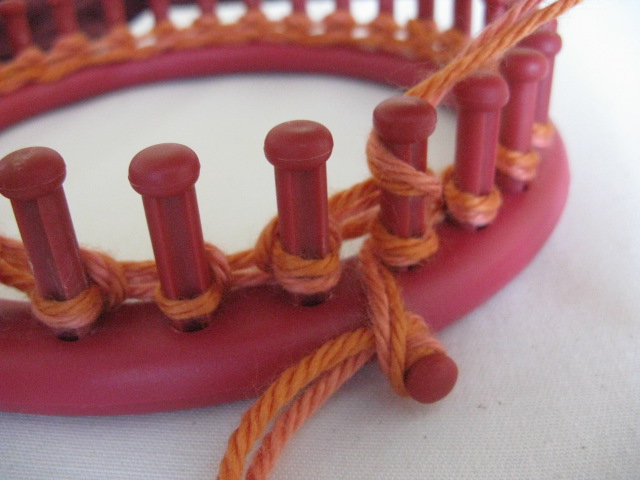
Using two stands of 4-ply worsted weight yarn, wrap the yarn on the edge of the ring. Pull the yarn to the inside of the ring and wrap around the first post. Repeat around the second peg, continuing until all the pegs are wrapped.
Keep the yarn loose as you wrap.

Slide the yarn to the bottom of the pegs, and continue to wrap a second row.

I like to anchor the yarn at this point by wrapping it around the peg on the edge.
Using the pick, lift the bottom row of yarn over the top row of yarn,

and over the top of the peg. Continue with each peg until you have finished one row of knitting.

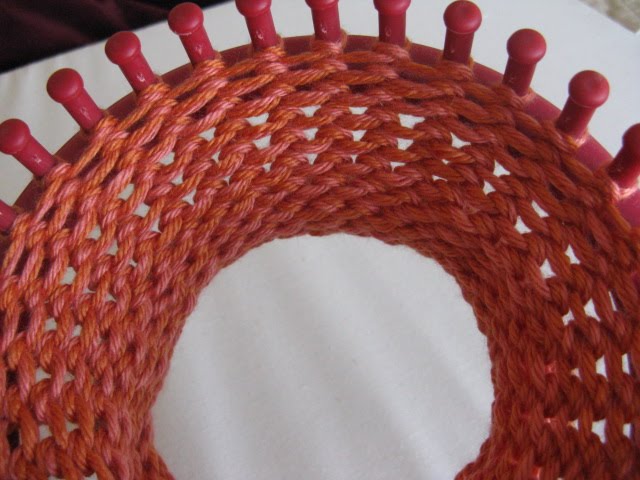
Make sure you slide the yarn to the bottom of the pegs, and continue wrapping another row.

The inside of the loom will look like this.

As you continue to knit the hat will grow longer.
To make the brim on the medium, you knit 4" and stop.

Reach inside the loom and place each loop from the bottom row over the corresponding peg. (*The loop is the long one, not exactly centered).
This will fold what you have knitted in half to form the ribbing on the bottom of the hat.
With the pick pull the yarn loops on the bottom of the pegs over the top ribbing row and over the top of the pegs. This leaves one row that you again, push to the bottom of the pegs.

Continue wrapping and knitting until the medium hat has reached 7-8 inches.

To finish the hat, thread the needle with around 18" of yarn.

Starting with the first peg run the needle and yarn through the loops on each peg, then lift the loops over and off the pegs.

You will see the top start to gather as you go.

This is what the top looks like once you've taken the hat off the loom.

Pull the thread tightly to gather the top

Take a few stitches in each direction to close the gap and secure the yarn.

Poke the needle to the inside of the hat.

And take a few more stitches with a square knot, and clip your threads.

You will see the beginning threads on the inside of the brim. These can be woven in and then clipped off.

Ta Dum! The hat is now complete! See how easy? If you have more questions, there are a lot of good video tutorials on YouTube, or feel free to e-mail me at nedras@mstar.net

These go rather fast. I've now made 3 just since yesterday.
My hats are to be given to Humanitarian Aid, but these would also make nice baby gifts. Pom Poms could be added to the top, or cute crocheted/knitted flowers sewn to the brim.
I had one comment yesterday that these looms are easier than traditional knitting for people with arthritis.
I also think these would be a fun project for children.

Wednesday, March 23, 2011

Knifty Knitter

I know that the Knifty Knitter looms have been around for a while, but I am just now finding the time to play with them.
Have any of you used these?
So easy!
I am not a knitter, and I could do hats with about 5 minutes of instruction.
The looms come with a detailed pattern (including pictures), but if you are a visual learner (like me), there are some helpful tutorials on YouTube.

I made my first baby hat in about 2 hours.

The pattern says it's best to use a Bulky weight yarn, or combine two stands of 4- ply worsted weight.
I have a lot of left over 4-ply, so I combined a light pink and a dark pink.

I've already started a second hat, this one will be a child size.
One of main motivations for making these hats is to provide donations for Humanitarian Aid provided through my church, The Church of Jesus Christ of Latter Day Saints.
With the heart wrenching stories taking place in Japan, I've hardly been able to watch the news.
Like many of you, I keep thinking I am only one person, but what can I do to help?
I feel very comfortable contributing through my Church because they are highly organized and 100% of donations go to those in need.
"Emergency Response – The Church strives to provide immediate assistance following disasters. The Church provides food, and other relief supplies as needed. In 2010 the Church provided relief to people affected by 119 disasters in 58 countries."
I know they are providing great assistance in Japan already.

One of the biggest challenges taking place in Japan is dealing with cold temperatures of winter.
Our donated quilts can make a difference, and so can a knit hat.

Tuesday, March 22, 2011

Show Me Your Muscles

There hasn't been too much quilting going on.
We've been playing outside in the Arizona sunshine that has been hovering close to 90 degrees.

Fun filled days where the boys run spontaneously through the sprinklers.
Show me your muscles!
These grandbabies bring so much laughter and joy.
Now that somebody can walk there isn't a safe shoe in the house.
Can't find a matching pair?
Make sure to check the garbage bin, which seems to be at just the right height and a tempting receptacle.
The slots of the back yard fence are even more enticing.

Yes, this walking thing brings all kinds of creative thought.
After all, if two of your brother's shoes look fun to wear, how about three?

Friday, March 18, 2011

First Loraine Went To Egypt

I've always been fascinated with quilt miniatures.
Very challenging to get exactness with such little tiny pieces.
It's one of the reasons First Loraine Went To Egypt caught my eye at the Arizona Quilters Guild Show.

Created by Barbara Poulson
Barbara has a friend Loraine who went to Egypt and brought back a Chant Avedissian's book Patterns, Costumes and Stencils as a souvenir.

Barbara drafted one of the designs and created this miniature.
I'm sure each block must be paper pieced.
Beautiful use of solid fabrics.

I really like this style.
It also gave me an opportunity to study up on Chant Avedissian, an Egyptian Contemporary artist.

Chant was born in Cairo 1951, son of Armenian refuges. "His style ranges from photography, to costumes and textile design to painted stencils."

We don't have to make a trip to Egypt to appreciate Chant Avedissan's work.

Thursday, March 17, 2011

Go! Dazzled

While I was at the Arizona Quilter's Guild Show I looked for quilts that seemed different than all the rest.
Go! Dazzled by Judy Steenblik definitely fit the bill.
In real life, this quilt was even more stunning than pictures could capture.

Completed as a Block of The Month, original design by Sarah Veddler Designs, featuring Accuquilt Go! Cutter and Dies.

Embellished with machine embroidered applique.
Quilted by Judy Danz.

Judy wrote "Despite apparent complexity of this quilt, even a beginning quilter can successfully complete this beautiful project."

Really!?

This beautiful quilt won the Laurene Sinema Award for Exemplary Workmanship.
I'll second that.

Sarah Veddler offers a lot of information on her web site about Go! Dazzled
including:
"In order to guarantee success, even for someone completely new to Embroidered Applique, I devised an easy system for placement..."
I'm still trying to comprehend this could be a project for a newbie.
Judy's card did say First Time Entrant.