Tuesday, November 30, 2010

Kaffe Knit Socks

My friend Beth Fyans knows how much I love anything Kaffe Fassett. I have admired his work for years, and he is the only fabric designer I collect.
So I was THRILLED when Beth knit me a pair of socks using Kaffe yarn as a Christmas present this year.

Look how warm and toasty these will be to wear this winter.
Thank you so much Bethie! I love them.

Beth remembered hearing me say: "One of my dreams (and on my wish list) is to learn how to knit. And when that time magically appears, I would like to start by knitting socks."
That moment is not on the horizon at present, but when life settles down somewhat I will be in line at the knit shop.
You will also find me sitting right next to my daughter Elizabeth, my friend Beth, and any other knitters I can find, asking a million questions.
Look out knitting world.

Until then, I will gaze fondly upon you.

Beth used Regia #4254 Mirage Earth
Made in Italy, wool, machine washable.
Did you know that in his early years as an artist, Kaffe was most known for his knitting?
From Kaffe Fassett Studio:

Kaffe ventured into the world of colourful yarn on a visit to a Scottish wool mill with fashion designer Bill Gibb. Inspired by the colours in the landscape, Kaffe was thrilled to find the same colours in yarns. He bought 20 colours of Shetland wool and some knitting needles, and on the train back to London a fellow passenger taught him how to knit. His first design appeared as a full page spread in Vogue Knitting magazine.

From Vogue International Magazine:
KAFFE ON COLOR
• Don't be afraid of colour - why limit yourself to just one shade of red when you can use seventeen? Layering colours will give your work resonance, so strive for a rich texture, even if it's worked in fifty shades of gray.

• Let your yarns inspire you. Make collections of yarn and display them in a basket where you can see them. I often open a drawer of yarn to organize it, and next thing I know I'm sitting down to knit.

Monday, November 29, 2010

Butterflies Are Free (At Last)

Butterflies Are Free is now home from the quilter, all bound and ready for display.

Finished size 75" X 98"
This quilt was such a great stash buster. I named mine Butterflies Are Free because the only fabric I purchased was the Kona black for the background.
Everything else came from my stash.

If you are interested in reading more about this quilt, you can follow my progress on post 7/9/10
and post 7/19/10

The original inspiration came from the Butterfly Block Tutorial by Amy of Mrs. Schmenkman
These 6" blocks really grabbed the eyes of so many quilters, and can be seen in various color ways all around blogland.

I decided to make my binding scrappy, to follow the theme of the inside of the quilt.

If we see butterflies, it can feel like spring (at least indoors).

I will be teaching Butterflies Are Free at Quilted Works after the first of the year.
Grab your scraps and come join me!

Saturday, November 27, 2010

Star Crazy November BOM

Do realize that in 4 days we will have ALL the instructions for Star Crazy?
What a fun year this has been making the Block of The Month with The Quilt Show. I have thoroughly enjoyed hosting our group, and watching your progress. You have inspired me!
For November we made 12 (4 1/2" X 8 1/2") Half Chain Blocks.

And the last of the full Irish Chain blocks.
They now sit snugly on my design wall, happily playing together...

...and looking forward to the day when they can all grow up to become something like this.
Do you think with December and all the holiday festivities we will have a chance to put Star Crazy together?
(oh well, it was a nice thought)

Wednesday, November 24, 2010

Thanksgiving Prayer

For each new morning with its light,
For rest and shelter of the night,
For health and food,
For love and friends,
For everything Thy goodness sends.

--Ralph Waldo Emerson (1803-1882)

Tuesday, November 23, 2010

He Loves Me, He Loves Me Not

Shar Pierpont, who works at Quilted Works, has made the cutest quilt.
He Loves Me, He Loves Me Not makes me feel like Spring is available year round.

Good news! This quilt will be offered as a class next quarter, and Shar has even put together kits.
One of the reasons this quilt is so happy and bright is Shar's use of Fun Flowers Collection by Holly Holderman for Lakehouse.
(The above fabric was used on the back)

Instead of using buttons for the flower centers, Shar added her special touch of yoyo's. Perfect addition.

He Loves Me, He Loves Me Not can be found in the book
Folk Art Favorites by Joined At The Hip

Monday, November 22, 2010

Chili, Corn, and Cheese Muffins

With the cold weather it's always so comforting to have a big pot of soup simmering on the stove, accompanied by warm muffins coming out of the oven.

I recently tried a new recipe: Chili, Corn and Cheese Muffins
These muffins just say Fall.

I liked this recipe because I had all the ingredients on hand.
First you combine the corn, cheese, flour, cornmeal, baking powder and salt in one bowl.

In another bowl mix the butter, sugar, eggs,milk and chilis.
Blend the two mixtures together.

Spoon the batter into muffin cups and bake.

Warm, gooey cheese bubbles across the top...

With sugar in the batter the muffin tastes rather sweet, and yet you can still taste the bits of green chili and corn.
Double yum.
CHILI, CORN AND CHEESE MUFFINS
1 Cup frozen white corn kernels, thawed
1 Cup coarsely shredded mild cheddar cheese
1 Cup coarsely shredded Monterey Jack cheese
1 Cup unbleached all-purpose flour, plus a little extra if needed
1 1/4 Cups fine or medium grind yellow cornmeal
2 tsp. baking powder
1/2 tsp. salt
1/2 Cup unsalted butter
3/4 Cup sugar
4 large eggs
1/2 Cup milk
4 oz. can canned diced green chilis, drained.
1. Preheat oven to 375 degrees.
2. In a medium sized bowl, combine the corn, cheeses, flour, cornmeal, baking powder, and salt.
3. With an electric mixer, cream the butter and sugar together in a large bowl until fluffy. Add the eggs, milk, and chilies, beating until well blended. Add the corn-flour mixture to the butter mixture. Beat well to make a thick, creamy batter that falls off the spoon in clumps. Add an additional 2 to 4 tablespoons of flour if the batter is still too loose.
4. Spoon the batter into the prepared muffin tin, filling each cup level with the top. Bake until golden and the tops are dry and springy to the touch, 20-25 minutes. A cake tester will come out clean when inserted into the center. Let cool in the pan for 5 minutes before removing to cool on a rack. Serve warm.

Sunday, November 21, 2010

More Scarves

Here in the desert of Southern Utah we appreciate rain. We recognize the great need for water that gives drink to an arid landscape, and fills our reservoirs in preparation for the hot summer days ahead.
St. George is located at the northern most tip of the Mohave Desert, with an average rainfall of only 8"annually.
We are also very spoiled by the sunshine. We get used to it and expect it everyday.
When it rains like cats and dogs, as it has this weekend, I remind myself not to complain.
But, it does makes a person want to huddle under a quilt and relax.

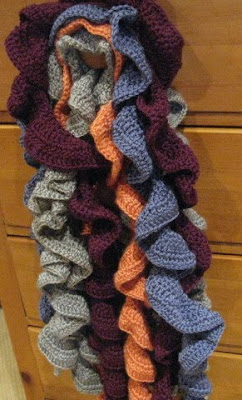
I've become addicted to making Belle scarves...and more scarves....and more scarves. Crocheting can be as therapeutic as quilting.

These really do look like sliced potatoes.

And when it's rainy and cold, it's the perfect time to find a some good DVD's and stay indoors.
When Lori (Bee In My Bonnet) was here a few weeks ago she brought along her
and introduced Jodi Nelson and I to the show.
I don't know where I was in 2000-2007 when the show was on the air, but I had never heard of it.
Lori got me hooked.
We laughed our heads off at the quick dialogue and fast paced humor.
I have found the series at my local library, and can almost hear Lori's wonderful laugh in the background during all the back and forth interchange.

And by staying indoors, I have spent time investigating parts of my Picasa program.
I now know how to write words on pictures.
This could be dangerous.

Tuesday, November 16, 2010

Certifiably Crazy

Love those Crazy Buggy Barn quilt books.
Certifiably Crazy...A Little Bit Crazy...Crazy Among Friends...(to name a few)
Did you know that BB has a Crazy Department?

Last night at Quilted Works I taught Pineapple Tidbits
from the book Certifiably Crazy

The book recommends using a mixture of light and dark greens and golds.
I threw in a few oranges too.

One of the most important tips is to use high contrasts between lights and darks.
A fat quarter friendly pattern.
I love working with the Buggy Barn technique. Cut out the fabrics in stacks, shuffle sections, and then sew everything back together again.

Voile! A Pineapple top.

Once the students learned how to make one pineapple, they were prepared to go home and finish up the rest.

Great job ladies!

Sunday, November 14, 2010

The Belle Scarf

With the crisp fall weather in the air, it's that wonderful time of the year when we get to bring out snugly scarves as additions to our wardrobes. I love wearing scarves. They are practical, and yet add style any outfit.
Have you noticed that scarves are timeless? They can dress up a young girl's tee shirt and jeans, or bring out the color of an elderly woman's eyes.
As a new crocheter, I've been having fun making the Belle Scarf, a free pattern offered by Lion Brand Yarn Company
The skill level is beginner.
That would be me.


The original pattern has the scarf made with Homespun yarn.
I opted to use a soft, medium worsted weight, and a size "I" crochet hook.
I've read where some title this style of pattern the "potato chip scarf". It does look somewhat like a long string of thinly sliced potato.


Even though it's November, we are enjoying the blue, blue skies against the red rocks of Southern Utah, accompanied by sunny days. I am happy to report that the flowers are still blooming in our yard.

Thursday, November 11, 2010

Bearded Santa Hat

Remember Beard Hats? (see post 10/5/2010)
Well, it gets even better.
With Christmas only 44 days away,we still have time to make
Bearded Santa Hats!
You just have to love those dangling corkscrew chin hairs.

pattern by Sandy's Cape Cod Originals
Have you ever noticed that the male models in these pictures ALWAYS wear sunglasses? (Do you think they might be worried about being recognized in public?)

More good news!
Bearded Santa hats can be made in Baby, Child, and Adult sizes.
Excuse me while I pick myself up off the floor, and dab my eyes with Kleenex.

Wednesday, November 10, 2010

Minkee Baby Blanket

A friend just had a baby, and I was trying to think of a gift to make that would honor her special occasion.
I wanted the gift to be personal, but because of time constraints I knew I needed something easy to make.

Quilted Works here in St. George, Utah had the perfect solution.
They have the most delightful selections of minkee I have ever seen. A room full of the most soft and snugly designs available on the market.
You just can't help but ooh and aaah and sigh just by touching it.
Makes grown men want to wrap themselves in fabric and take a nap right then and there.
But I digress...

The bolts of Minkee come in 60" wide. Quilted Works makes a baby kit by cutting a yard, and then cutting that yard in half lengthwise. (Making a 30" X 36" piece) They match a cute front to a cute back, and a kit is born.
The only work left to do is:
  • Put right sides together, and sew a seam all the way around leaving a small space for turning.
  • Turn and then stitch all around the edges.
  • Voila! You are done!
  • (yes, it's that easy)

Here are some tips that Quilted Works gave me for working with Minkee:
  • When you first bring the fabric home, throw it in the dryer for about 10 minutes on FLUFF (no heat). This will help remove all those pesky little shreddy pieces.
  • Set your stitch length to be a little longer, around a "3"
  • Use a walking foot.
  • Pin like crazy. This stuff is very slippery. Placing pins close together will make a big difference in the keeping the two pieces evenly together.