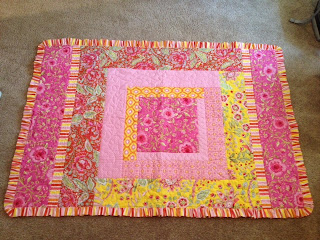
My friend Vickie recently shared with me
her technique for
adding a ruffle to the edge of a quilt.
Very simple to do
and another fun way to edge a quilt
rather than using the traditional binding method.
Pattern:
by Threaded Pear
First, determine the size of the ruffle.
Vickie's ruffle was about 3-inches wide.
She cut a 6-inch width and then folded in half.
For the length,
measure around the outside of the quilt and then
double, allowing for gathers.
Using a pearl cotton
zig zag the thread down using a large stitch
about 1/4th inch from the cut edge of the ruffle.
A size 5 Pearl Cotton allows
enough strength without breakage for gathering
a long length of ruffle.
Once the thread is stitched down,
tug on the end
and gather evenly.
With an erasable marker,
Vickie had previously drawn a
1/2-inch line around the edge of her quilt
as a guide
so her quilter would not stitch completely to the edge.
Before sewing in the ruffle,
trim the batting back to the 1/2-inch mark.
Lay the ruffle around the outside of the quilt,
making sure the gathers are even.
Once you are happy with the gathers,
flip the ruffle so the raw edges match evenly
against the edge of the top of the quilt.
Pin in place.
Pin in place.
Sew down with a scant 1/2-inch seam allowance
to the top only.
to the top only.
Turn the quilt over
and iron the backing down 1/2- inch
to the inside of the quilt.
to the inside of the quilt.
*Covering the seam line,
stitch down.
*you can either do this by machine or by hand.
Gently press the ruffle around the corners and
edges and you are done!


4 comments:
Great idea Nedra, it looks fabulous! xo
Hey thanks for sharing Nedra!! Great idea and looks simply enough to do!!
Cutie patootie pink/yellow quilt.....and the ruffle is the perfect finish!!
Looks good and easy to do too,Thank you for the idea.
I love this edge rather than the bias binding. Thanks for the tutorial so I can do it now.
Post a Comment